My little English learner doesn’t English speak often, but loves saying ‘it’s Tuesday!’. She and I have a daily ritual for when I finish work in the evening. The aim is to encourage her to speak a few words in English. So I’d always say “see you tomorrow”, encouraging her to repeat it in response, as I would then ask “and what day will it be tomorrow?” Some days, particularly on Monday’s, I would get a very proud response.
To facilitate this little ritual, I thought it would be useful to have a little board where we could change the days of the week. These boards exist, you may have seen them, but it seemed like we could learn even more by creating o ne ourselves.
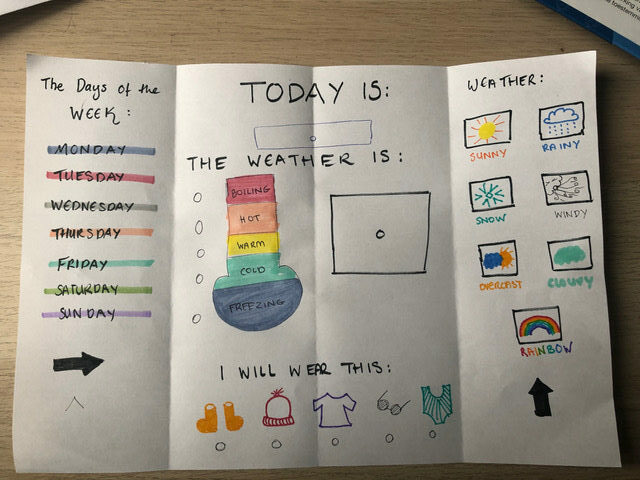
I sketched a rough outline of what the board would include, and we set to work. We only got half-way, and I’ve been told we have to buckle down to work again soon to complete the other half. But in case it can help anyone, it’s a super fun activity and we made everything together. Below, a step by step process.
Making a day and weather board:
Materials needed:
- White A4 paper
- Card stock
- Laminating plastic
- Crayons and markers
- Velcro attachments
- A sturdy backdrop
Estimated cost: 20 euros
The steps to follow:
- Engage your little learner in the project: explain the end goal and the steps to follow. In our case, I repeated this step multiple times as it took us several months to complete the project, and we did take a few breaks, but she never lost interest, so don’t lose hope if it takes a while!
- Fold your white A4 paper to the size of the cards you eventually want to make. We folded the paper into 16 squares for the weather, 8 for the days of the week. Folding is fun, and the lines help set the boundaries for what you write or draw on the card.
 Make the days of the week cards. Depending on the abilities of your learner, you can either write out the days of the week and have your learner trace or copy them onto the card, or you can guide them, for example by spelling out the letters of the day, and have your learner write this out themselves.
- Make the weather cards. Follow a similar process as with the days of the week card. Your learner can draw the weather themselves, or you can help them out by drawing an outline and having them colour this in.
- Make the headings such as “What day is it?” and “What’s the weather like?” (as the photo shows, we didn’t have space for all these letters).
- If your learner is creative and enjoying the process, don’t hesitate to make some extra cards just for fun.
- Cut out the cards, glue them onto cardstock of the same size, and laminate the cards. They’ll be handled often, so this just protects them more, but isn’t strictly necessary depending on the strength of the card stock you use. We made many practice cards together using the extra cards, but for the final cards, I completed this step at home.
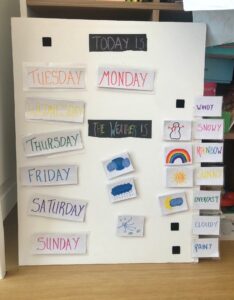
- Place you cards on the board. Once you’re happy with their placement, your learner can apply one half of the Velcro attachment to the card, the other onto the board (I found it easiest to apply both sides to the card first, and then to stick the card in place as it helped guide the placement of the little Velcro spot on the board).
- Cards that aren’t used can be stuck back in place onto their Velcro holder, and you’ll have open Velcro spots under the two headings where your learner can place the correct day and the weather.
- Have fun moving things around and talking about the day and the weather 🙂
By. Sanne Verheul, CAP student 2021-2022


